Campaign Summary Overview
The ThruText admin campaign page is where you can go to view the results of the campaign. It is your central hub for managing a ThruText campaign. From this page, you can view campaign settings, track sender activity, analyze response data, and adjust messaging content. This guide walks you through each section of the page so you can confidently manage every part of your texting campaign.
TABLE OF CONTENTS
Accessing the ThruText Campaign Summary Page
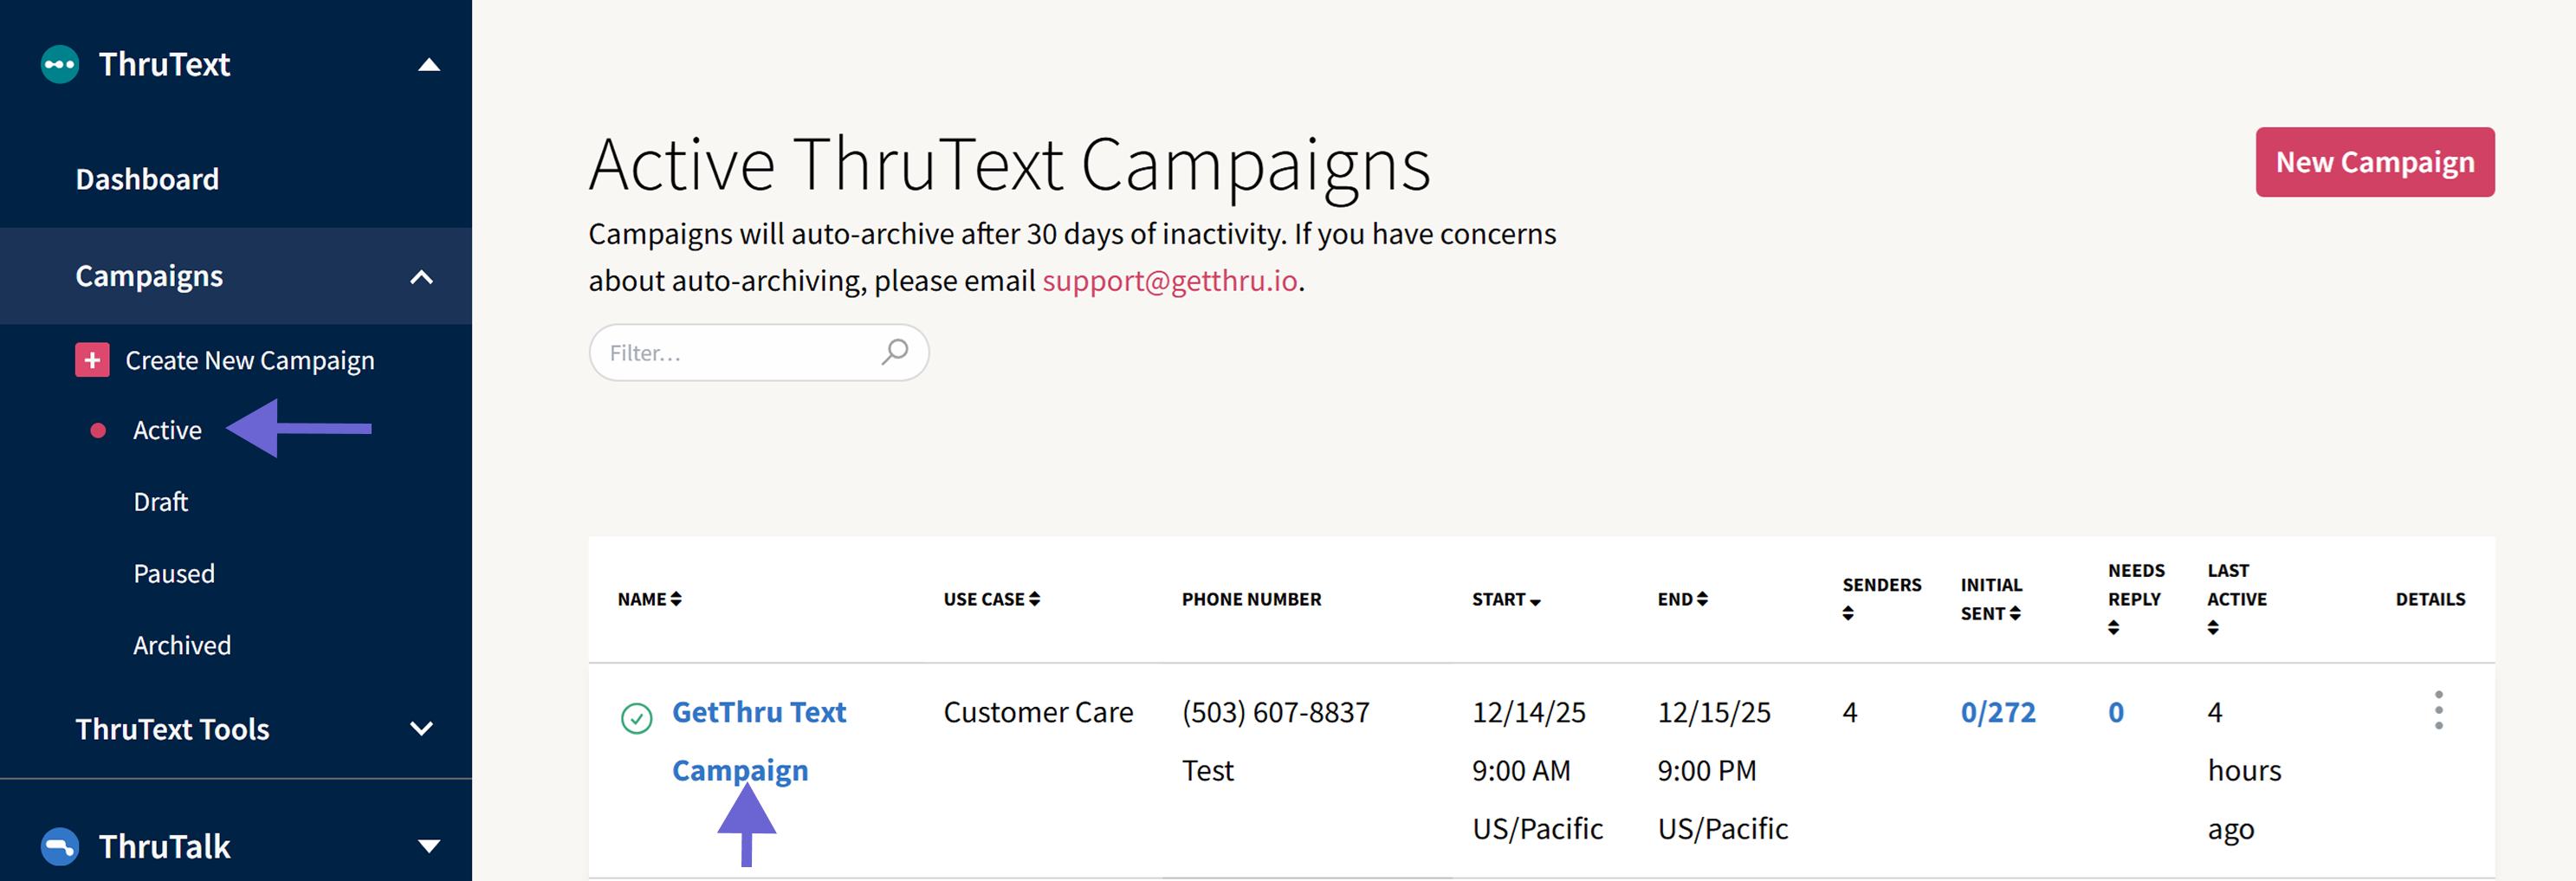
Once a campaign has launched, it will be listed as active. On the Campaign Index page, you can click on any campaign's name to view individual campaign details. For a full walkthrough, check out the ThruText Campaign Index page.
ThruText Campaign Summary Page
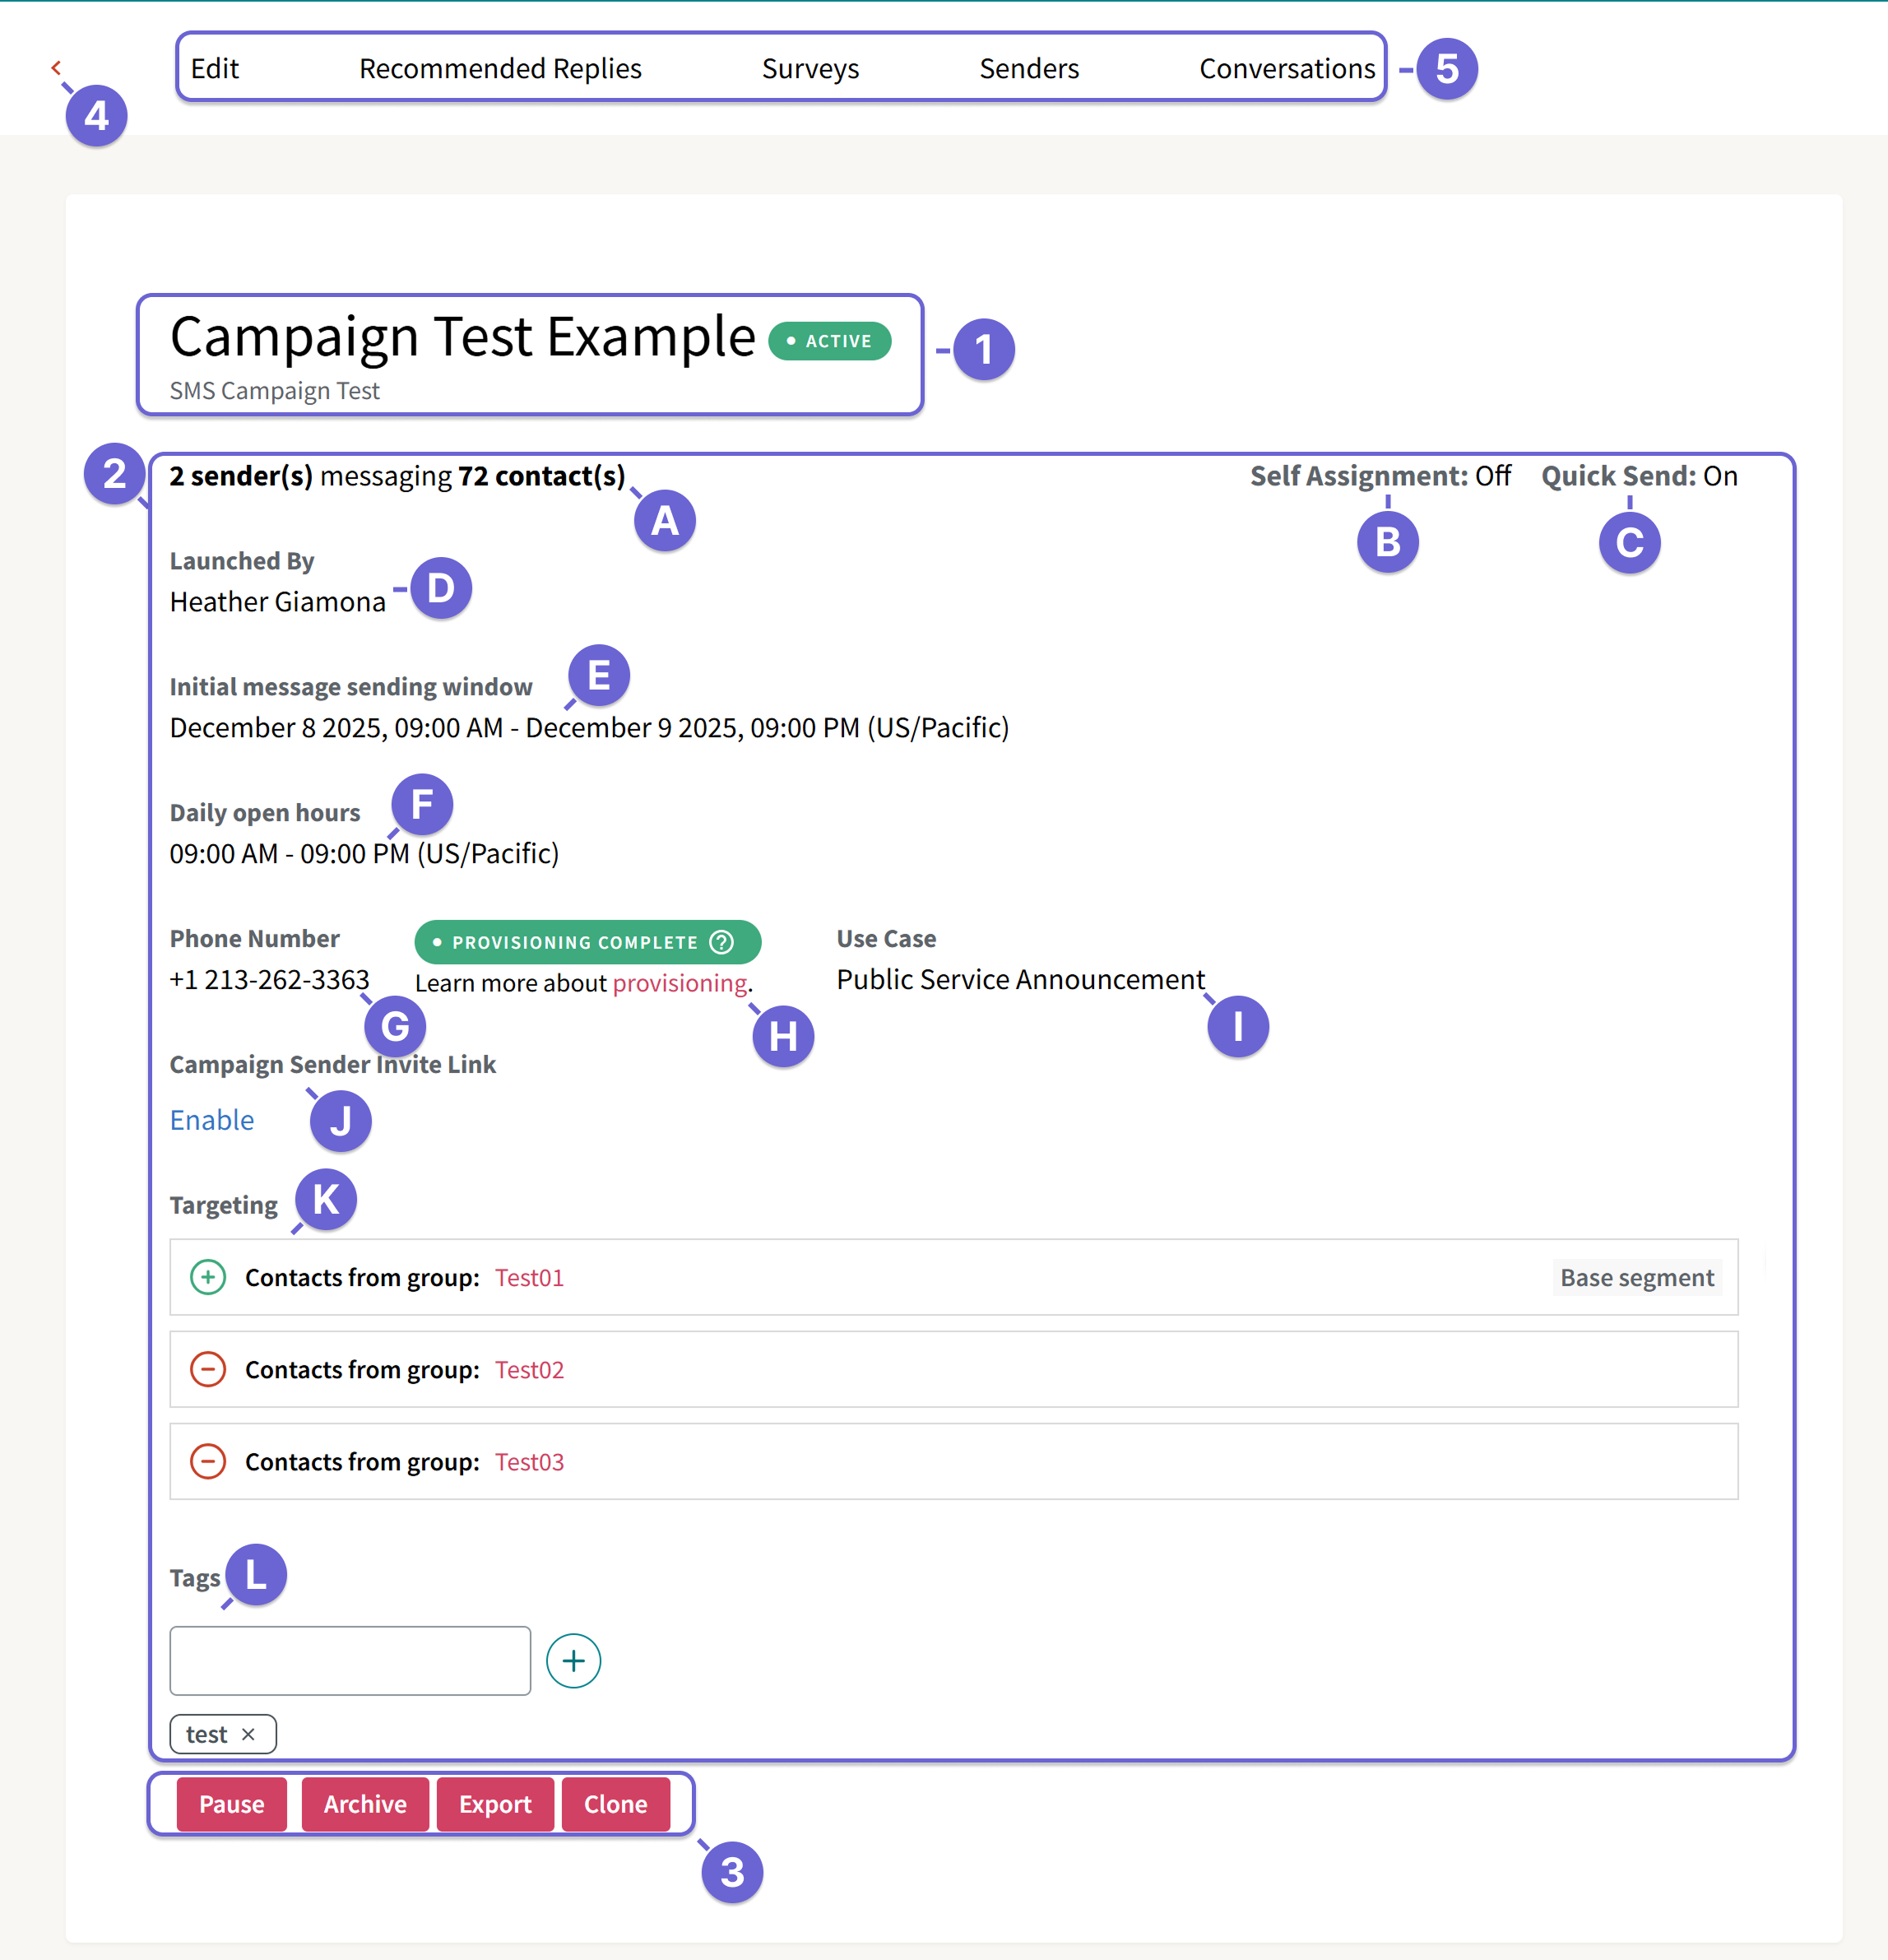
The Campaign Summary page includes a default Summary page with five top menu tabs available.
- Campaign Descriptors: These identify and describe the campaign and are visible to callers.
- Name: The name you chose for the campaign.
- Description: The campaign description you chose for the campaign
- Status: Campaigns can be 'Active', 'Inactive', or 'Archived'. The campaign's state is in the colored oval bubble next to its name. In the example above, the campaign is in the 'Active' state.
- Campaign Details
- Sender to contact ratio: Total number of senders messaging the total number of contacts
- Self Assignment: When enabled the Self Assignment section lists the number conversations assigned to senders when they request a new batch.
- QuickSend: When enabled, this confirms the QuickSend status.
- Launched By: The person that launched the campaign.
- Initial Message Sending Window: The timeframe when initial messages can be sent.
- When the window has passed, senders will no longer be able to send initial messages, and assignments will only display if there are replies.
- The start date and end date in the initial message sending window can be edited after launching the campaign. Review the Edit section below for more details.
- Daily Open Hours: The hours in which the assignment is accessible by users and outgoing messages can be sent. Its main purpose is to ensure that text messages aren't sent to contacts during inappropriate hours.
- Senders: After the campaign's close time, but before opening, senders will see the message This assignment is closed in the User Messenger. Senders can refer to our guide on Texting Hours for more information.
- Admins: After the campaign's close time, but before opening, admins will see a message for Campaign is Currently Closed but can still view the conversation thread. If an admin attempted to send a message, it would be queued for the next open hour due to our sending system.
- Phone Number: The sending phone number for the campaign. This will show you which phone number was selected when setting up your campaign. This can be a dedicated phone number or a single use phone number based the selected area code region.
- Provisioning Flag: States the provisioned status of the campaign sending phone number.
- Use Case: The use case attached to the campaign.
- Campaign Sender Invite Link: This is a self-join URL for senders. Senders can use the invite link to add themselves to the ThruText campaign.
- Select Enable or Disable for the invite link to turn it on or off. Deleting is permanent for that specific link, and turning it back on generates a new link.
- To join via the link, a sender must be a user in your GetThru account. If the user has not yet been added to the account, you must invite them first. Learn how to do this in How to Invite Users.
- Users will be navigated directly to their assignment in the messenger when they click the link. Check out the following guide for details on the process to Set Up Self Assignment.
- Targeting: Selected contact list group(s) or past campaigns for outreach.
- Segments: These are the contact list groups or past campaigns attached to this campaign, either added or removed.
- Link: Clicking on the source link will bring you to the Groups Details or Campaign Details page. For more information, review the Groups Details Page.
- Filters: Confirms past campaign call survey or reply status filtering options, if applicable.
- Tags: Tags that were added to a campaign during campaign creation. Admins can also add additional tags directly from this page. Check out our guide Tag Reports for more details.
- Sender to contact ratio: Total number of senders messaging the total number of contacts
- Campaign Action Buttons: These buttons are visible from all Campaigns Tabs.
- Pause: Pauses the campaign. Pausing a campaign will add a Script tab option where you can update your campaign's initial message.
- Archive: Archive the campaign. Archiving a campaign is the final step of administering a calling campaign. Once a campaign has been archived, users will no longer be able to continue receiving calls or access it; changes cannot be undone. Need more detail? Check out our Campaign Archiving guide.
- Export: Takes you to the exports page where you can generate campaign level exports. Check out the Campaign Export section below for more details.
- Clone: Creates a clone of the campaign. Cloning is useful for quickly setting up a new campaign by copying your current campaign's settings into a new one. Find detailed steps in Cloning a ThruText Campaign.
- Arrow to head back to the campaign index: This button takes you to the Campaign Index page.
- Campaign Tabs: The Campaign Details page includes five tabs by default, and a sixth tab in paused campaigns, which will be detailed below.
Campaign Tabs
The Campaign Summary page includes the following five tabs in an active campaign: Edit, Recommended Replies, Surveys, Senders, and Conversations.

The Campaign Summary page includes an additional sixth Script tab in a paused campaign:

Edit Tab
After launching your campaign, the Edit tab allows you to make certain updates to campaign settings

The Editable Fields:
- Campaign Name
- Campaign Description
- Campaign Time Zone
- Start Date and Time: The start date and time can be edited to the current time or later, but not to a date and time prior to now.
- End Date and Time: The end date and time can be edited to a date and time post the selected start time.
- Daily Open Time: The open time for can be edited to the current time or later, but not to a time prior to now.
- Daily Close Time: The close time can be edited to a time post the selected start time.
- Organization ID: The name that will display to contacts based on the required %OrgName% variable. For carrier compliance purposes, it should be representative of your organization name.
- Opt Out Language: The unsubscribe keyword shared with contacts that they can use for opting out. This section provides a drop-down menu of compliant phrases to choose from. To stay compliant with carrier requirements and avoid account suspension, the opt out language must not be removed from initial messages when sending.
Script Tab
The script tab is only available in paused campaigns. It allows you to make edits to your initial message content.

- Required Variables: Required variables that must be inserted into the initial message text, based on the organization name and opt out language selected for the campaign at launch. These fields can be updated via the Edit page.
- Optional Variables: Optional variables that can be inserted into the initial message text, includes variables based on data from contact groups and trackable links, if added during the launching process.
- Add a media file: Add a media file to your SMS campaign to create an MMS campaign before sending out your initial messages.
- Message Text: The initial message text that will be sent to contacts.
- Message Type and Count: The message segment type (7-bit or unicode) and the total count of SMS segments and characters. Please check out our Text Message Segments and Encoding guide for more details.
- Message Preview: A preview of the message that will be sent to contacts.
- Update Script: The button to save the edits you have made to the initial message.
Recommended Replies Tab
The Recommended Replies tab is where you can create campaign level replies or add previously created global replies. Please review our Recommended Replies guide for more details.

- Create New Reply: This button takes you to the Add a New Recommended Reply section.
- Replies
- Edit: Option to edit your recommended reply title or message content.
- Delete: Option to delete your recommended reply.
- Add a New Recommended Reply: Write up a recommended reply for your campaign.
- Title: The recommended reply title that is visible from the Admin Messenger and User Messenger.
- Campaign variables that can be inserted into the reply message text.
- Message Text: Where you can create the prewritten content for senders to use in conversations with contacts.
- Message Type and Count: The message segment type (7-bit or unicode) and the total count of SMS segments and characters.
- Message Preview: A preview of the message that will be sent to contacts.
- Add New Recommended Reply: Confirmation button to save the new recommended reply.
Surveys Tab
The surveys tab is where you can create campaign level survey questions or add previously created global survey questions. Please review our Surveys guide for more details.

- Create New Question: This button takes you to the Add a Question section.
- Survey Edit
- Edit: Option to edit your survey question content. You cannot edit the survey type once selected.
- Delete: option to delete the survey question if unused and no initial messages have been sent. This only only displays for a paused campaign.
- New Question: Add a campaign specific survey question.
- Survey Type: The type of question to ask the contact. Options include the following:
- Yes/No question
- Multiple Choice question
- Freeform question
- Checkbox question
- Question: The question to ask contacts and collection responses for.
- Choices: The response options for the survey question.
- Add another choice: The selection to add additional response options. Alternatively, you an input a comma separated list when inputting your Choices response.
- Add Question: Click the Add Question button to save the new question.
- Survey Type: The type of question to ask the contact. Options include the following:
- Global: Survey questions available across account. Please check out our Global Survey Question creation guide for more details.
Senders Tab
The Senders page is where you can add or remove senders or choose sending preferences, such as allowing self assign or disabling QuickSend, if enabled for the account.
Only senders who have accepted the invitation to your organization can be added. You can search for senders by first name or last and add them by clicking on their name or the checkbox next to it.

- Choose Senders: Senders connected to the account but not attached to the specific campaign.
- Chosen Senders: Senders currently attached to the campaign.
- Add Via Email: Paste a comma-separated list of sender email address.
- Self Assignment: The option to allow senders to request more conversations based on the desired conversation limit.
- Campaign Sender Invite Link: This option is only available when self assignment is enabled. Checking this option enables the self join link for the campaign, which can be accessed via the Campaign Summary details section.
- QuickSend: The option to add QuickSend to a campaign. Accounts with QuickSend have this enabled by default, but can disable it per campaign by unchecking the QuickSend option.
Details about adding Senders After Launch:
- Texters added to campaigns after launch will not receive an automated email announcing their assignment. To send an email, click the Remind button next to the sender's name. Check out the Sender Overview section below for more detail on that option.
- Senders won't be automatically assigned conversations, and all of the conversations in the campaign will be categorized under Unassigned.
- Once the senders are added to the campaign, they can use the Request Conversations option, if Self Assign is enabled.
- You can manually assign conversations to senders using the Reassign option.
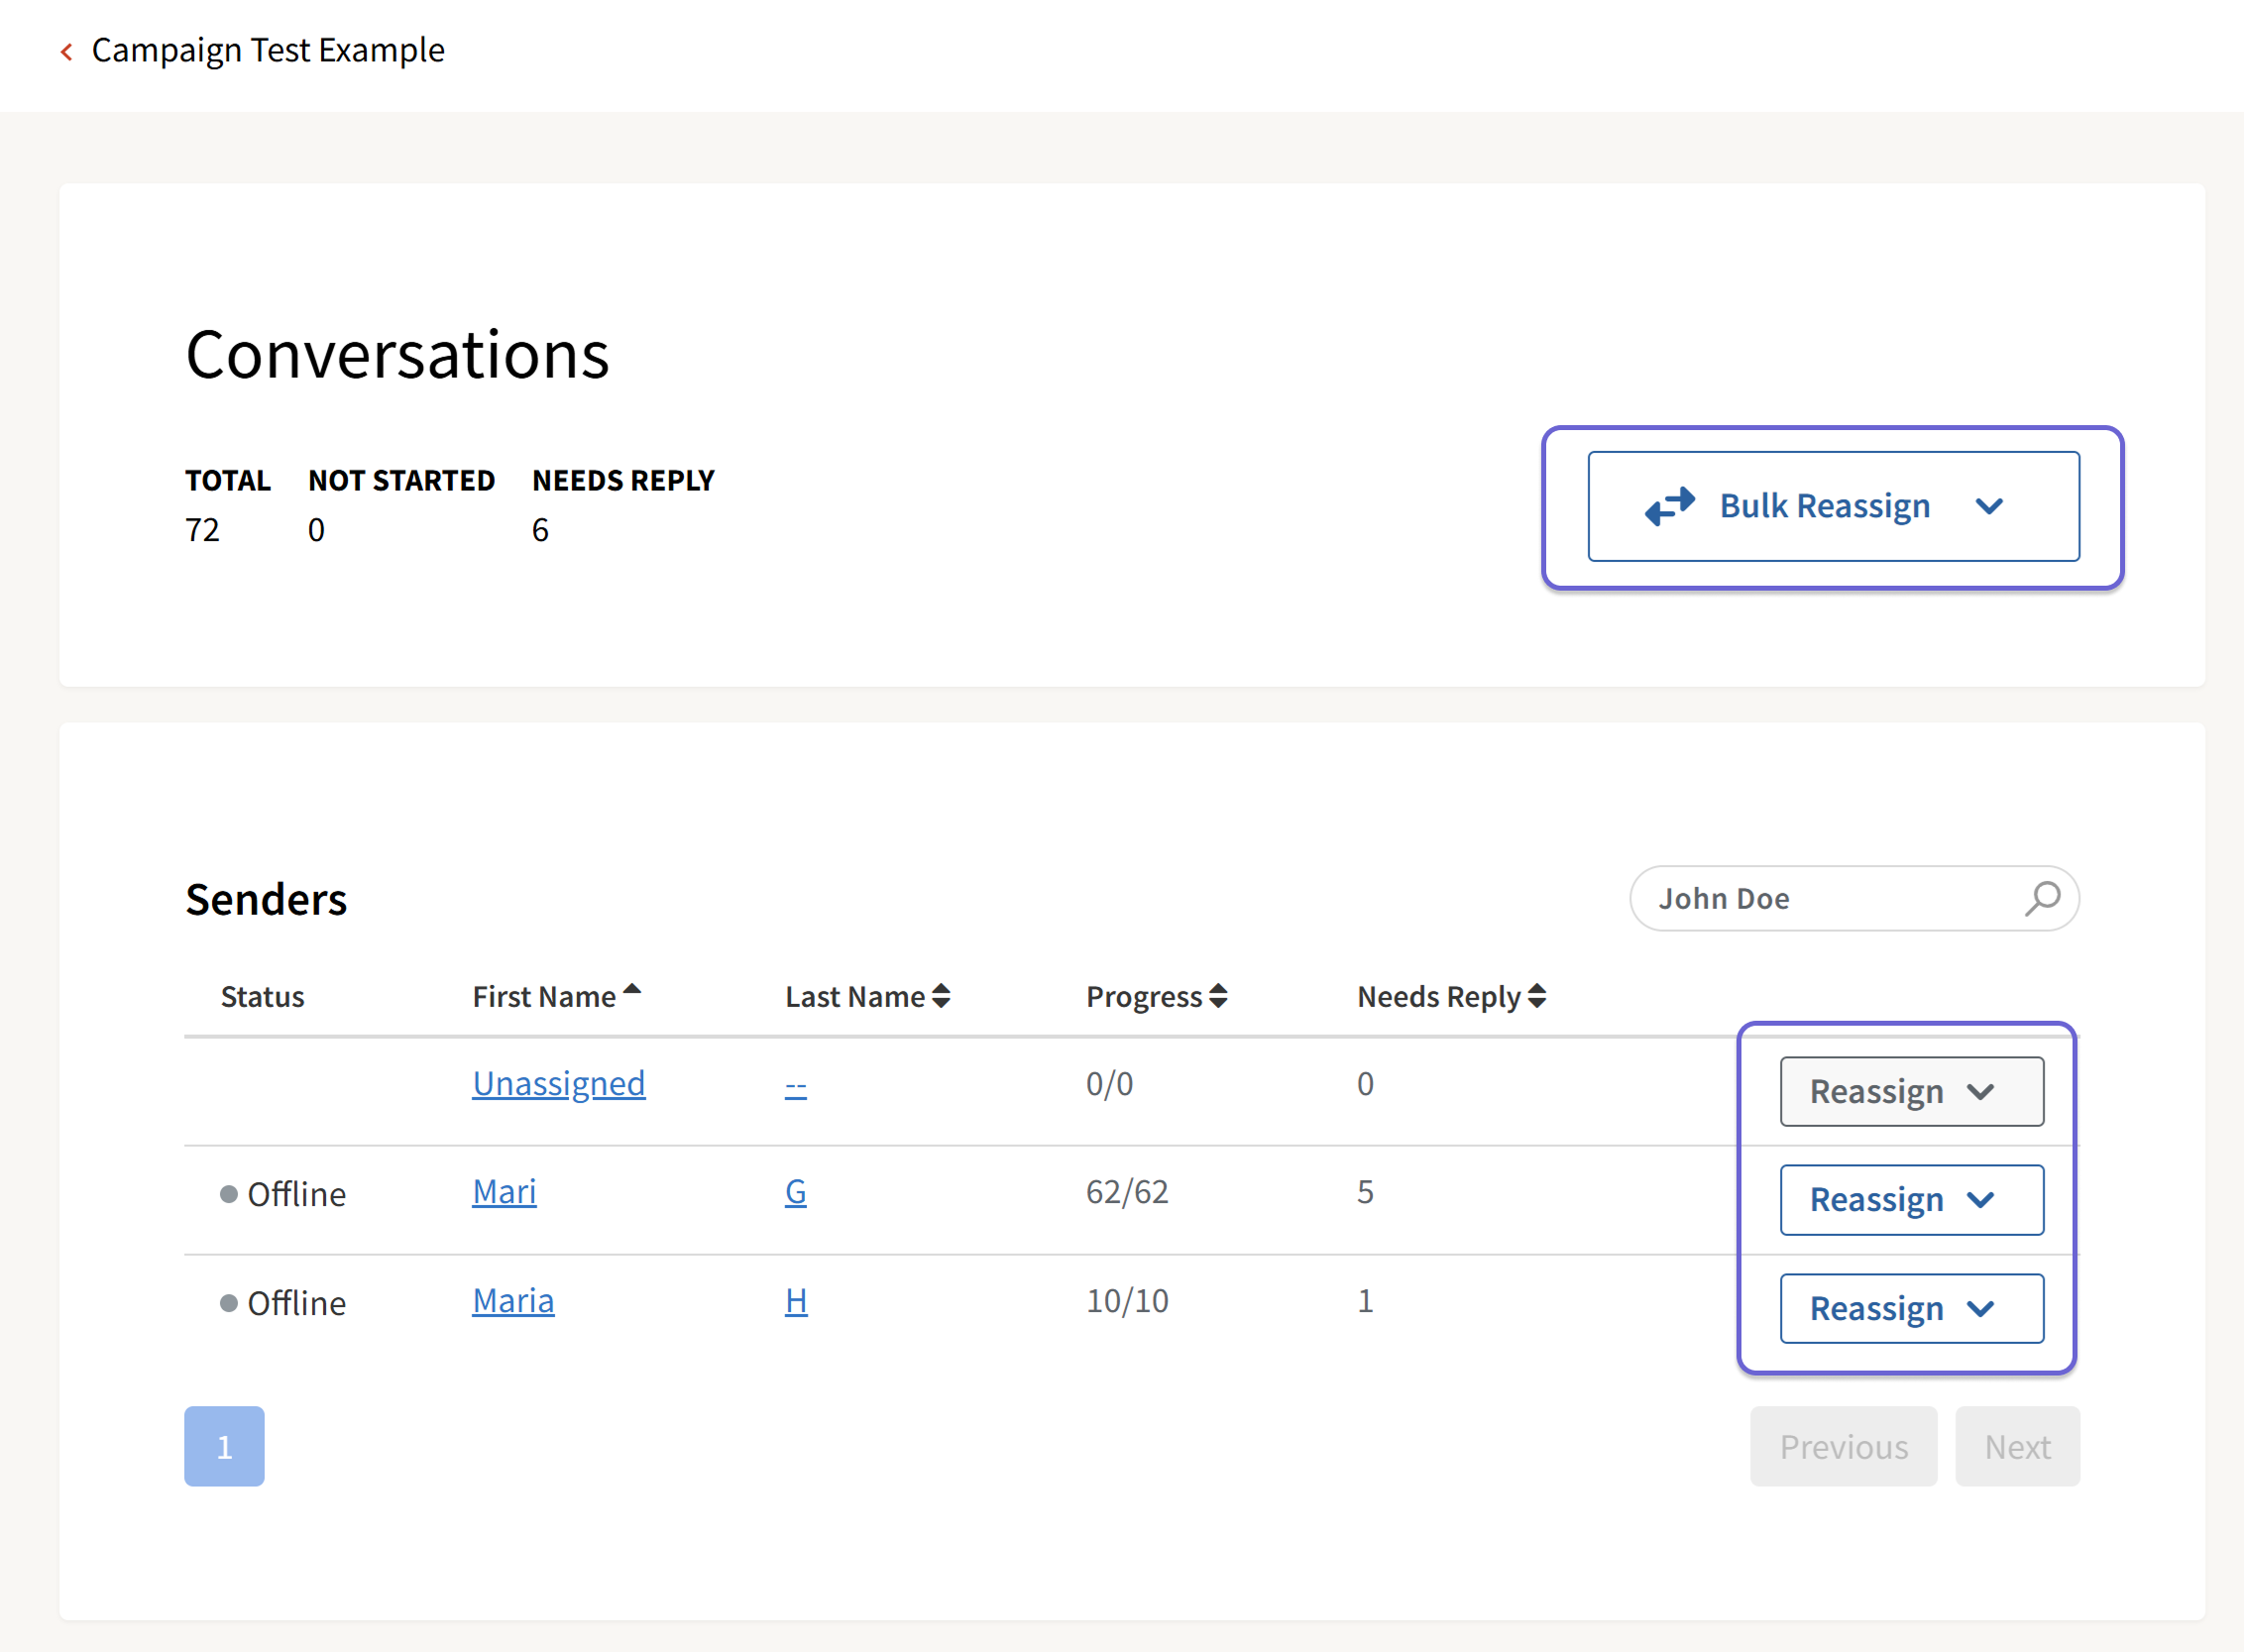
Conversation Tab
This tab leads to the Conversation Overview page. This page allows you to view and manage all conversations within the campaign, including reassignment and review. For full details on conversation and sender status review, please check out our guides Conversations Overview Management and Reassignment and Admin Messenger Management and Reassignment.
Campaign Exports
Campaign exports are how you pull data about your campaign out of ThruText. Exports come as CSV files, and each contains the campaign's complete data at the time of the export creation. The campaign exports page provides an listing of all exports generated.
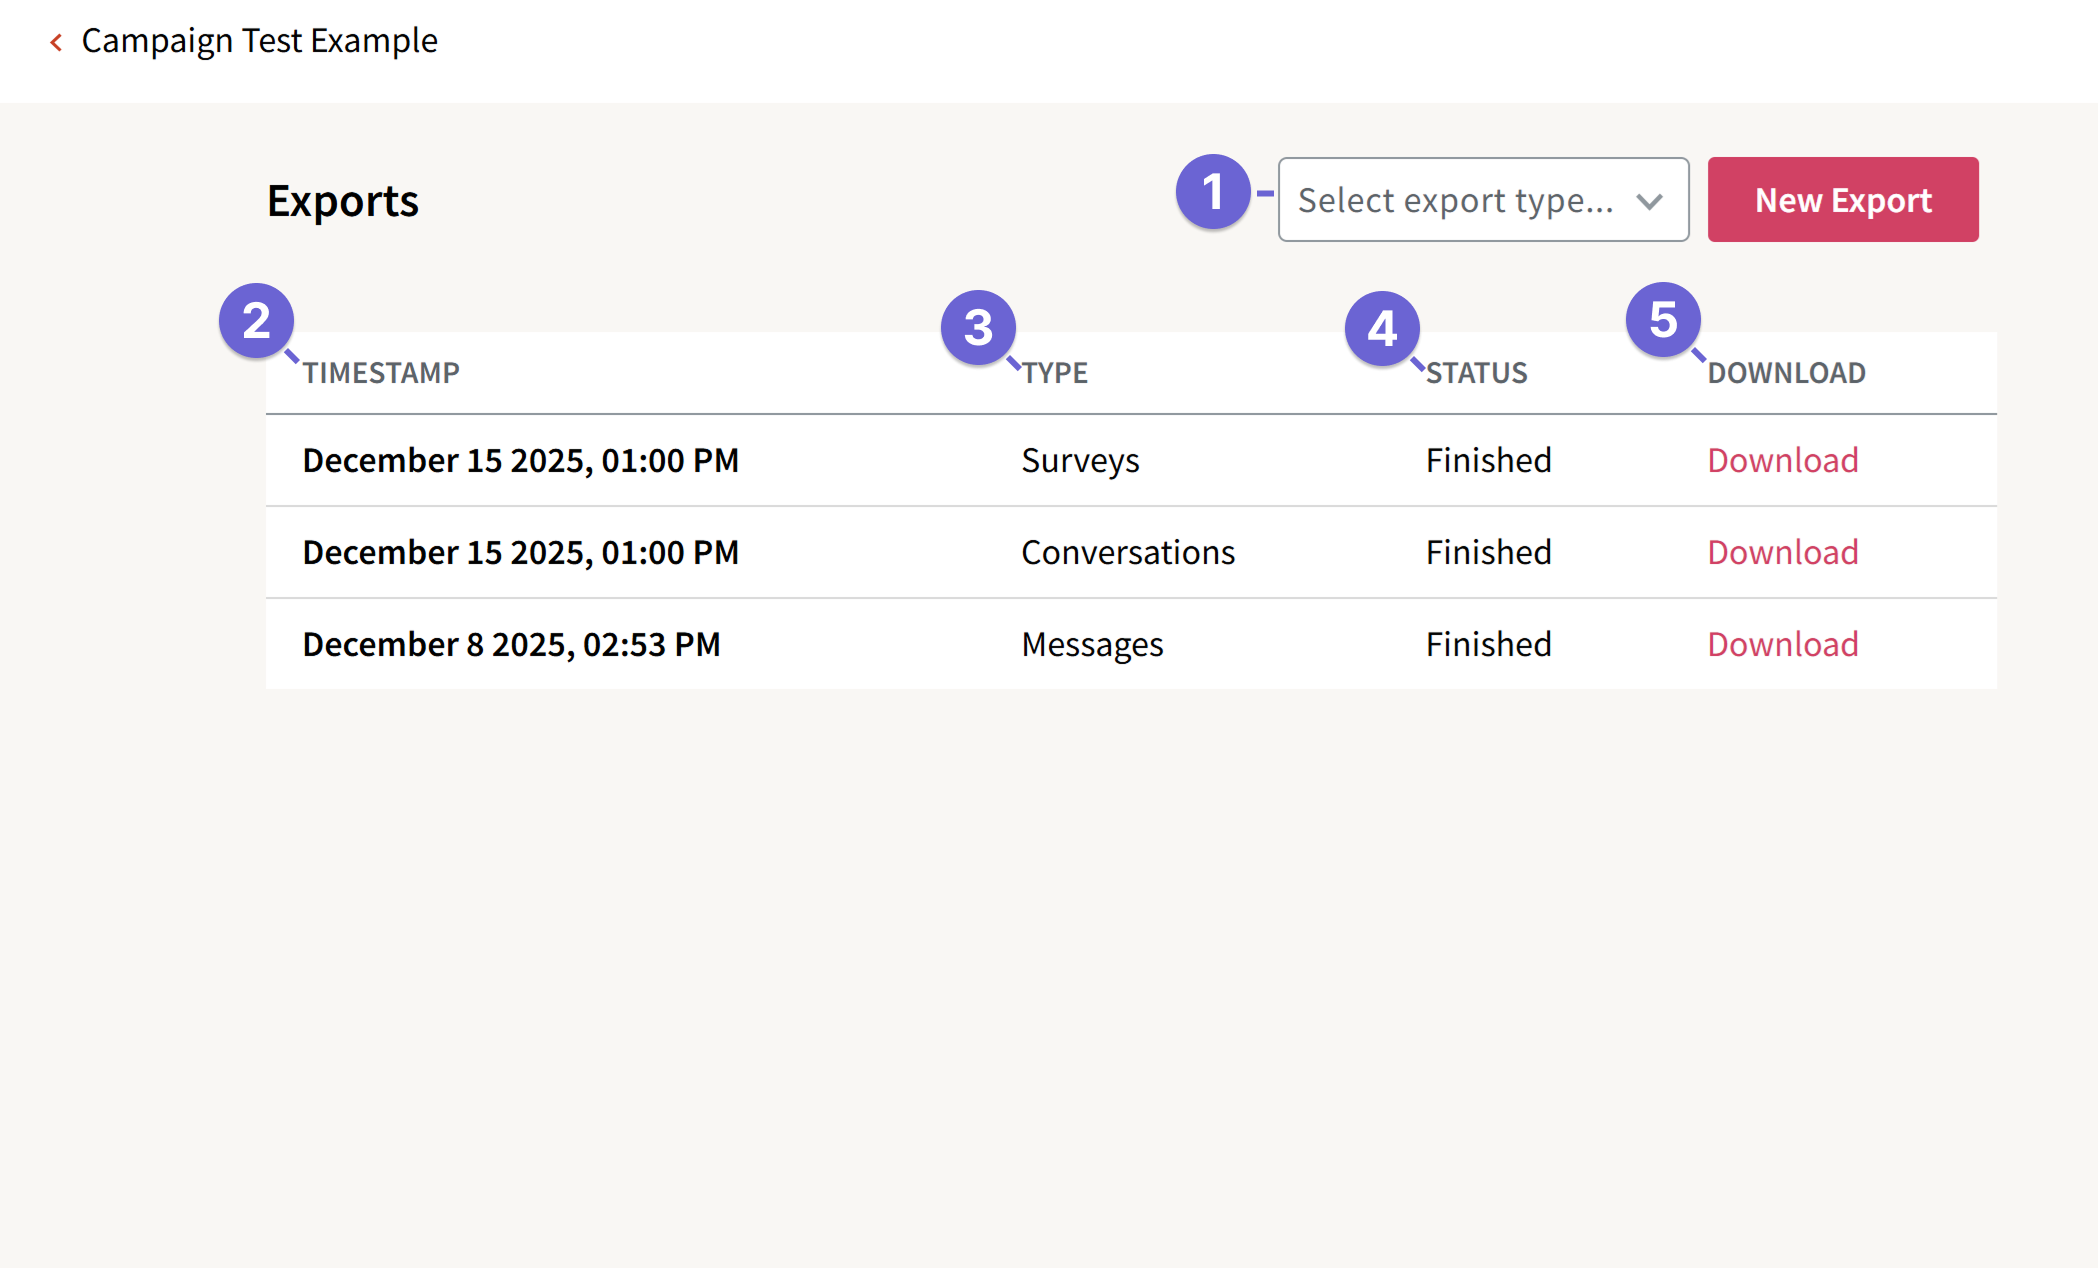
- Select and Export Type and press New Export to generate a file.
- Timestamp: The date and time the export was requested
- Type: The type of export generated. This can be Surveys, Messages, or Conversations.
- Survey exports produce a CSV of every contact that had survey data and all the fields associated with them.
- Message exports produce a CSV of every outgoing and incoming message sent, outgoing SMS segments count totals, the status of the message, if there was an error the message error code and type, along with who sent it and when.
- Conversation exports produce a CSV of every conversation in the campaign with outgoing/incoming message details, outgoing segments counts, if an opt out is manual or auto, outgoing message error counts, link click count, as well as the assignee for each conversation.
- Status: The status of the export. This may be processing or finished. Only finished exports can be downloaded.
- Download: A link to download the generated export file.
All campaign exports can include up to 3 custom fields for contacts. If you do not see the custom field you need, please confirm that the Included in Export box is clicked on the custom fields page in your account.
For a full breakdown of the data included in each export type, check out our article on Export Types.
Campaign Analytics
The Analytics section helps you assess message performance and sender engagement across your campaign by providing valuable statistics. This includes details on initial messages sent, replies, opt outs, and more.

Analytics
- Initial Sent: This box shows how many initial messages have been sent so far in the campaign out of the total amount of conversations. In the example above, 72 out of 72 initial messages have been sent.
- Senders:Contacts: The Senders:Contacts statistic shows a ratio of senders to contacts, and is calculated by dividing total conversations by total senders. In the above example, there are 2 senders, so there's a ratio of 36 conversations for each sender.
- Segments: This statistic counts how many outgoing Segments have been sent from a campaign. This number only counts SMS segments, and does not include MMS messages. Above, in the 72 conversations in which messages have been setup, a total of 73 segments have been sent. You can create a campaign export of the messages to see the segment count for each message.
- Queued: Queued messages are messages that were held back and not sent to our downstream providers because they observed a 10DLC rate limit. Queued messages are automatically sent when capacity becomes available within the rate limit due to sending system. To better understand rate limits, we recommend reading the guide Throughput and Queuing Post-10DLC.
- Delivery Rate: Delivery Rate is the ratio between messages that are in the "Sent" status that haven't encountered errors to the total amount of messages in the "Sent" status. In the above example the delivery rate is X%. Admins can refer to this guide on assessing message deliverability.
Replies
- Total Replies: Total Replies is a count of how many conversations have received any reply from a contact. In the screenshot above, 7 contacts have replied to their conversations. This number includes conversations that have been opted out.
- Total Reply Rate: In the Total Reply Rate, admins can see the ratio of replied conversations to Initial Sent. In the example above, out of the 72 initial messages that have been sent, 7 conversations have been replied to, making the reply rate 9.72%.
- Non Opt-Out Replies: This number counts how many conversations have a reply that are not opted out. In the above example, there are 6 Non Opt-Out Replies.
- Non Opt-Out Reply Rate: This rate is calculated by taking Non Opt-Out Replies and dividing it by Initial Sent. This rate shows what percentage of replies were not opt-outs. The Non Opt-Out Reply Rate in the image above is 8.33%.
Opt Outs
This section will appear different based on the Auto Opt Out setting. If Auto Opt Outs is enabled, admins will see all three of the following statistics. If Auto Opt Outs is disabled, admins will only see the "Total Opt Outs" figure.
- Auto opt outs: Auto Opt Outs are conversations in which a contact responded with an auto-opt out keyword and were automatically opted out by the application. In the example above,X contacts were automatically opted out by ThruText, not by a sender.
- Manual opt outs: Manual Opt Outs represents the number of conversations in which a sender manually clicked Opt Out in this campaign. If a contact was opted out in another campaign, via the Phone Number lookup tool, or via the Opt Out Manager page, this statistic will not count those contacts. Reviewing our example, we see X conversations have been opted out of this campaign.
- Total opt outs: This number is the total amount of Auto Opt Outs and Manual Opt Outs on this campaign. In the above example, there are 0 Auto Opt Outs and 1 manual opt out, which equals 1 total opt out.
Followups
The Followups section is where you can manage your draft and launched followups. From this section, you can create new followups, update drafts, or launch followups.

- Search Box to find a followup based on title
- Create Followup button to create a new followup
- Title: The title of the followup
- Status: The status of the followup, which can be draft, launched, or cancelled
- Launch-Expiration: The expiration date for the followup
- Audience Size: The total contacts included in the followup
- Script: The followup message content
- Actions:
- Drafts: Draft followups will include options of Launch, Edit, or Cancel
- Launched: Launched followups will include options of Edit or Cancel
Please check out our Followup Messages in ThruText guide for details on creating a followup message.
Senders Overview
The senders section shows each sender that is attached to the campaign and their progress through conversations.

- Search Box to find a sender based on name
- First Name: The sender's first name
- Last Name: The sender's last name
- Progress: The sender's conversation progress for many initial messages they've sent (left) and how many they've been assigned (right)
- Actions:
- Remind: Send a reminder email to the sender
- Thanks: Send a thank you email to the sender
Survey Responses
The survey responses section gives an overview of the responses that have been recorded for each survey question within the campaign.

Initial Message
The initial message section shows a preview of the initial message of the campaign. The initial message can be edited in an active campaign by pausing the campaign and accessing the Script tab to make edits.

Please review our guide Launching a ThruText Campaign for information on campaign creation.