Campaign Summary Overview
The Campaign Summary page gives admins one place to review settings, monitor caller activity, and track results for any ThruTalk campaign. This guide details how to analyze important campaign information, such as campaign settings, caller activity, and results. It walks you through what you’ll see on the page and when to use each section.
TABLE OF CONTENTS
- Accessing the ThruTalk Campaign Summary Page
- ThruTalk Campaign Summary Page
- Campaign Tabs
- Removing Campaign from View
Accessing the ThruTalk Campaign Summary Page
Once a campaign has launched, it will be listed as active. On the Campaign Index page, you can click on any campaign's name to view individual campaign details. For a full walkthrough, review our guide ThruTalk Campaign Index Page.

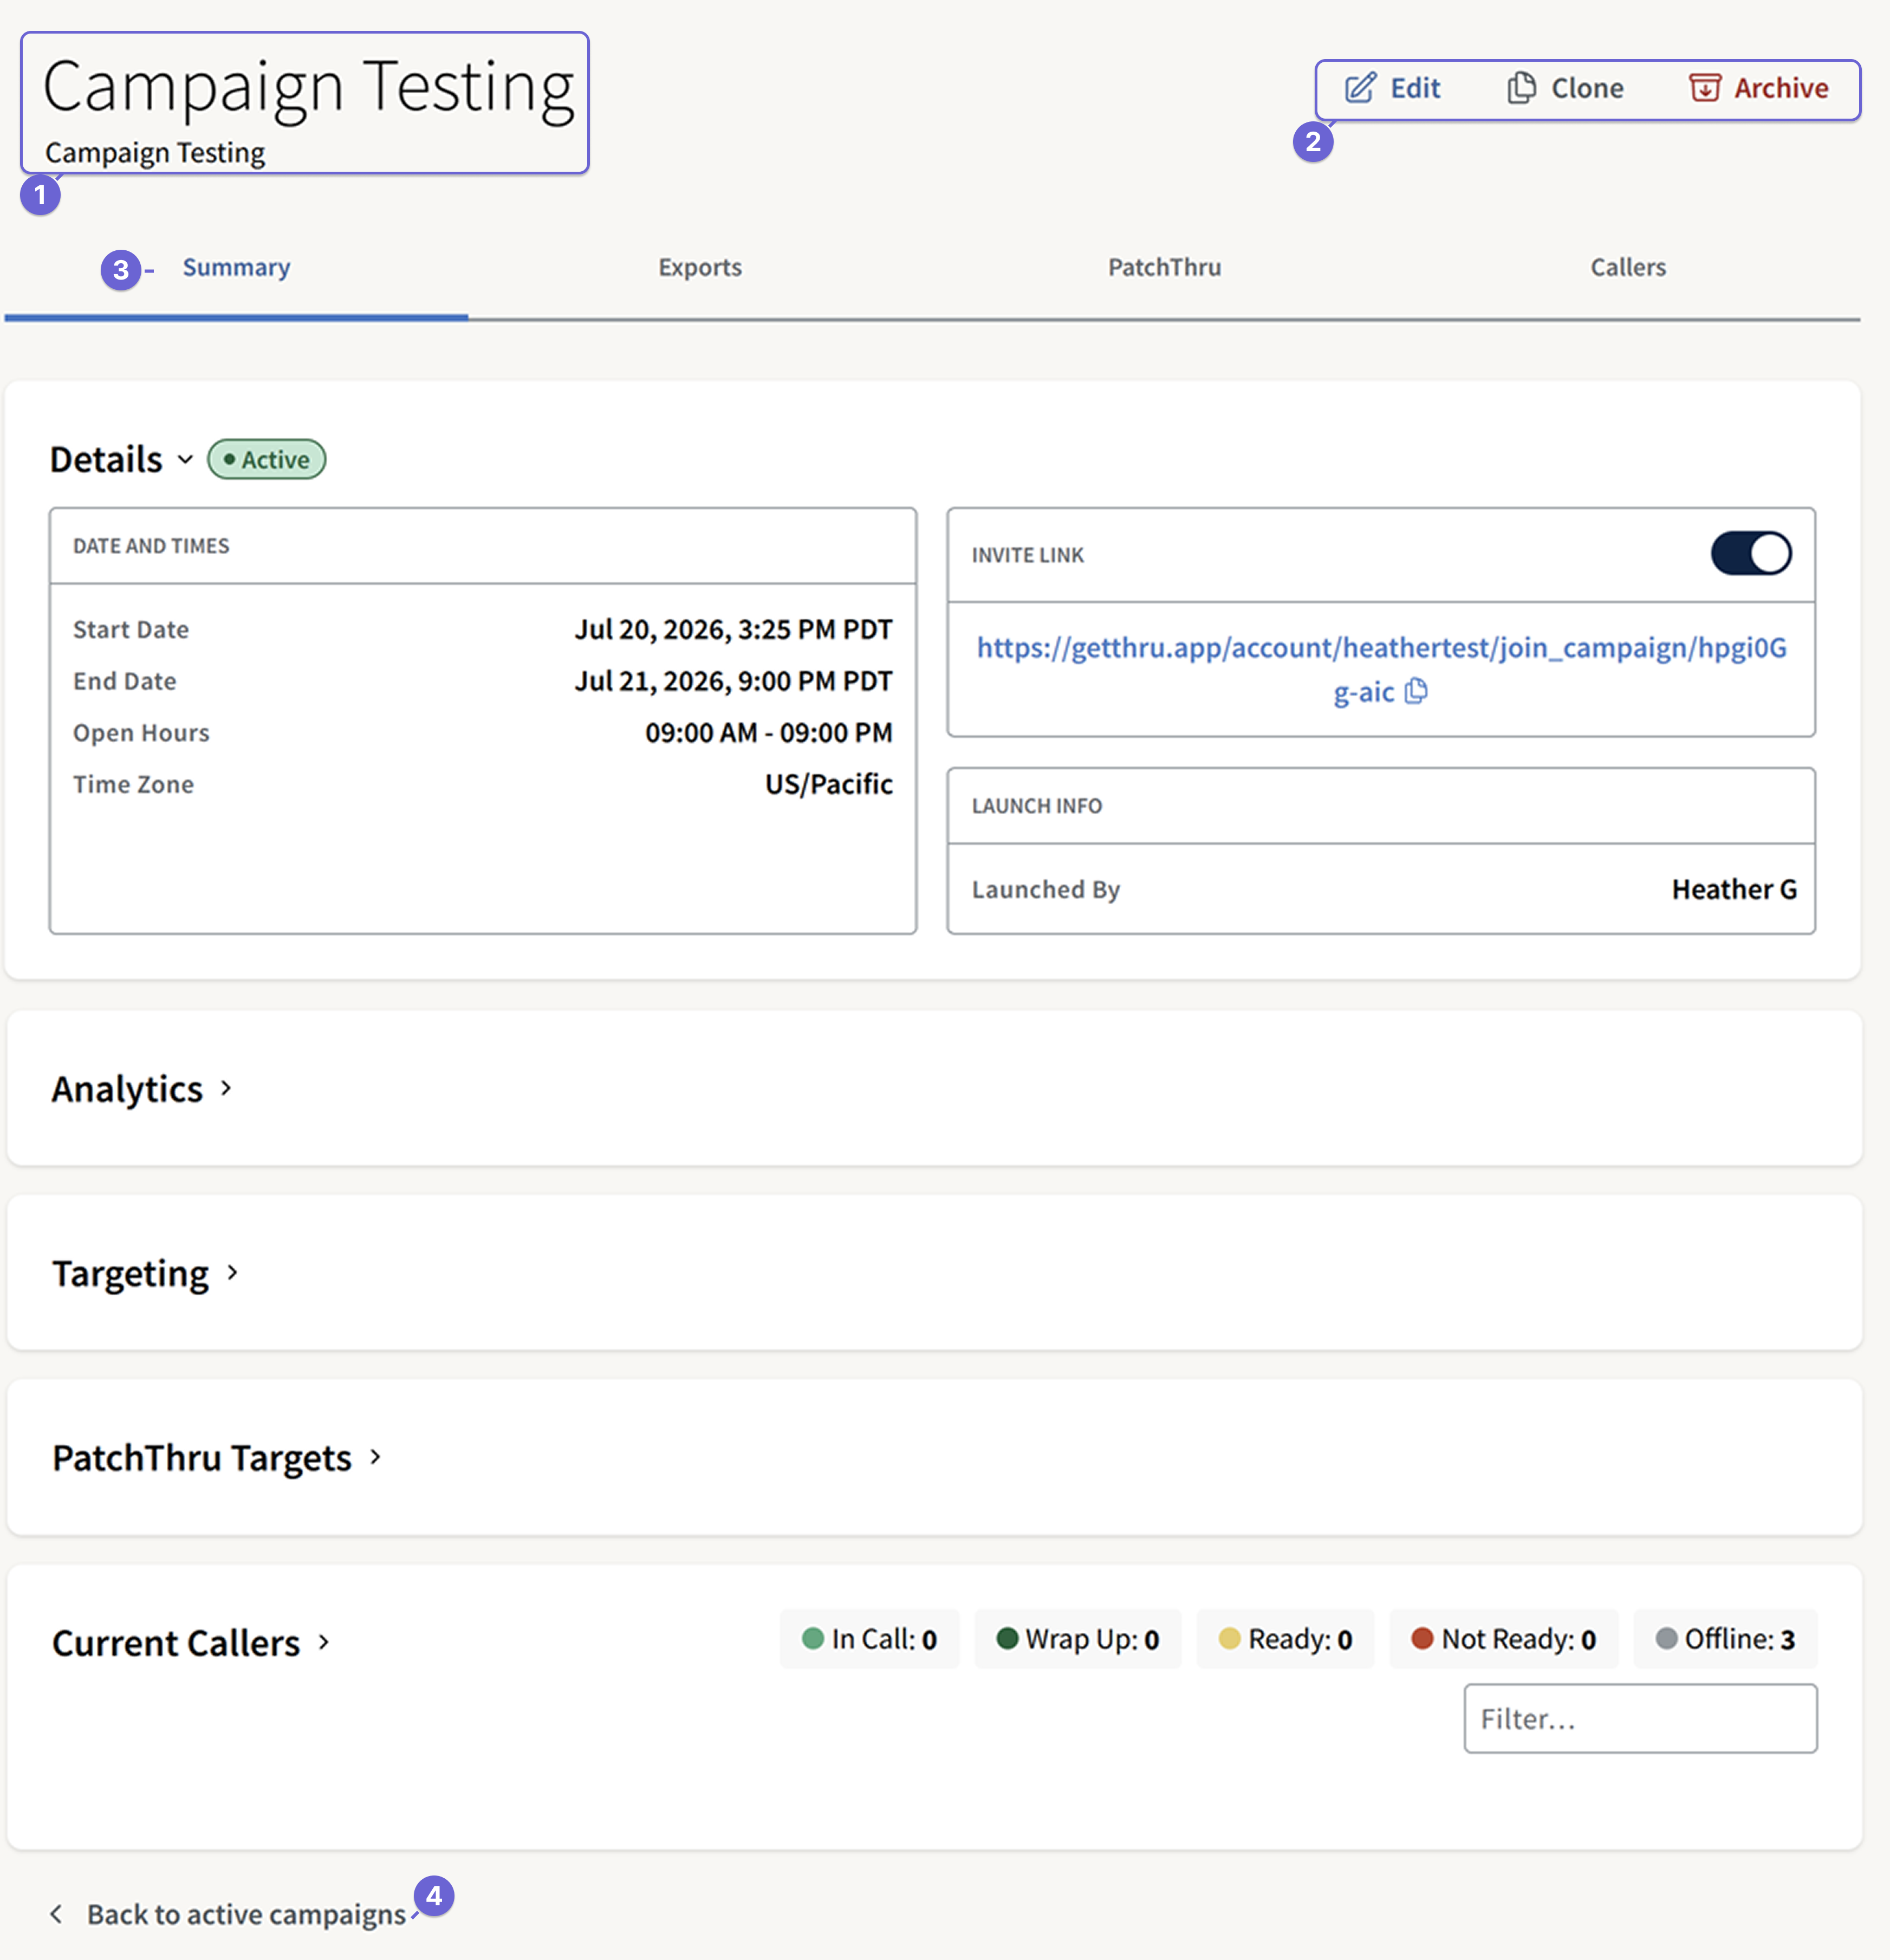
ThruTalk Campaign Summary Page
The Campaign Summary page includes four tabs, with the tab Summary being the default when opening the page.
- Campaign Descriptors: These identify and describe the campaign and are visible to callers.
- Name: The name you chose for the campaign.
- Description: The campaign description you chose for the campaign
- Campaign Action Buttons: These buttons are visible from all Campaigns Tabs.
- Edit: After launching the campaign, click Edit to update certain fields. The editable fields include the following: Name, Description, Time zone, End date, Daily open time, and Daily close time.
- Clone: Creates a clone of the campaign. Cloning is useful for quickly setting up a new campaign by copying your current campaign's settings into a new one. Find detailed steps in Cloning a ThruTalk Campaign.
- Archive: Archive the campaign. Archiving a campaign is the final step of administering a calling campaign. Once a campaign has been archived, users will no longer be able to continue receiving calls or access it; changes cannot be undone. Need more detail? See our guide Campaign Archiving.
- Campaign Tabs: The Campaign Details page includes four tabs. Summary is the default tab, shown in the screenshot below with its five sections. The additional tabs, Exports, PatchThru, and Callers, are detailed below.
- Back to active campaigns: This button takes you to the Campaign Index page.
Campaign Tabs
The Campaign Details page includes four tabs: Summary, Exports, PatchThru, and Callers.
Summary
The Summary tab overviews your full campaign details with cards for each section: Details, Analytics, Targeting, Current Callers, and PatchThru Targets.
Details
Use Campaign Details to confirm start/end dates, dialing hours, and the invite link so you know when calling is allowed and how callers can join.
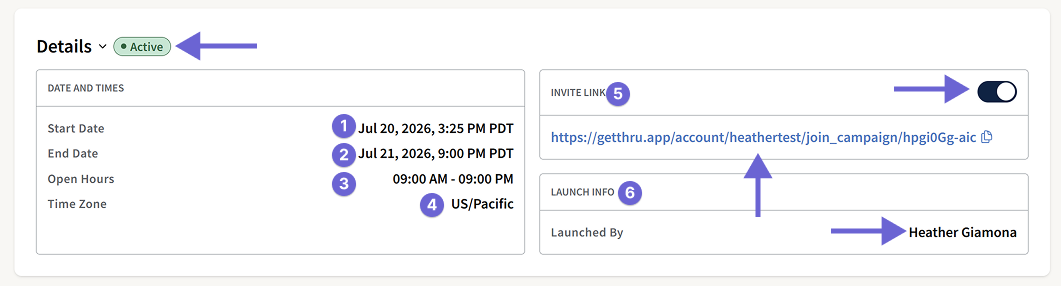
- Start Date: The date selected for your campaign to start and be active.
- End Date: The date selected for when your campaign will end and no longer be active.
- Open Hours: These are the hours your calls can go out. (These are reflected in the time zone chosen above.) Read more about dialing hours in our guide Understanding Dialing Hour Enforcement.
- Time Zone: The time zone you select defines when dialing can begin and end.
- Invite Link: This is a self-join URL for callers. Callers can use the invite link to add themselves to a ThruTalk campaign.
- Toggle the invite link on or off. Turning it back on generates a new, campaign-specific link.
- To join via the link, a caller must be a user in your GetThru account. If the caller has not yet been added to the account, you must invite them first. Learn how to do this in How to Invite Users.
- Launch Info: The name of the person that launched the campaign.
Analytics
The Campaign Analytics section displays the campaign's dials and PatchThru progress. These statistics will update as calls are completed, and you will view the most current details when you open the page or refresh the browser.

- Call Analytics
- Dial Progress: The Dial Progress box shows the amount of completed dials and the total dials in the campaign.
- PatchThru Analytics
- PatchThrus: The number of successful PatchThru connections.
- Failed Attempts: The number of failed PatchThru connections.
- Average Duration: The average length of time between a successful connection to a PatchThru target and when the contact and PatchThru target end their connection.
Targeting
Targeting summarizes who you’re calling— call from number, scripts, and segments—so you can verify audience settings at a glance.
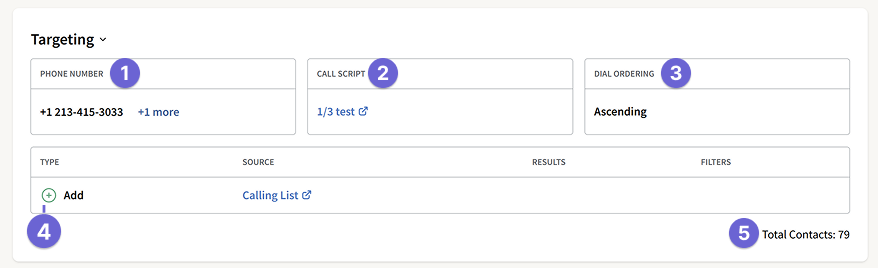
- Phone Number: This will show you the assigned phone number(s) based on which Area Codes you selected when setting up your campaign.
- Call Script: This is the active script you selected for your campaign. Clicking the link will bring you to the script builder. For data integrity purposes, only limited edits are available after launching a campaign. For a full walkthrough, open Creating a ThruTalk Script.
- Dial Ordering: Sets whether calls cycle by last name in ascending or descending order.
- Segment: A segment is how contacts are added to the campaign.
- Type: These are the groups or past campaigns attached to this campaign, either added or removed.
- Source: Clicking on the source link will bring you to the Groups Details or Campaign Details page. For more information, review the Groups Details Page.
- Results and Filters: Confirms past campaign call result filtering options, if applicable.
- Total Contacts: Total number of available contacts for calling. This number is reflected from the group(s) or past campaign(s) selected while setting up the campaign.
Current Callers
Current Callers lists everyone assigned to this campaign and their live status, helping you monitor callers.
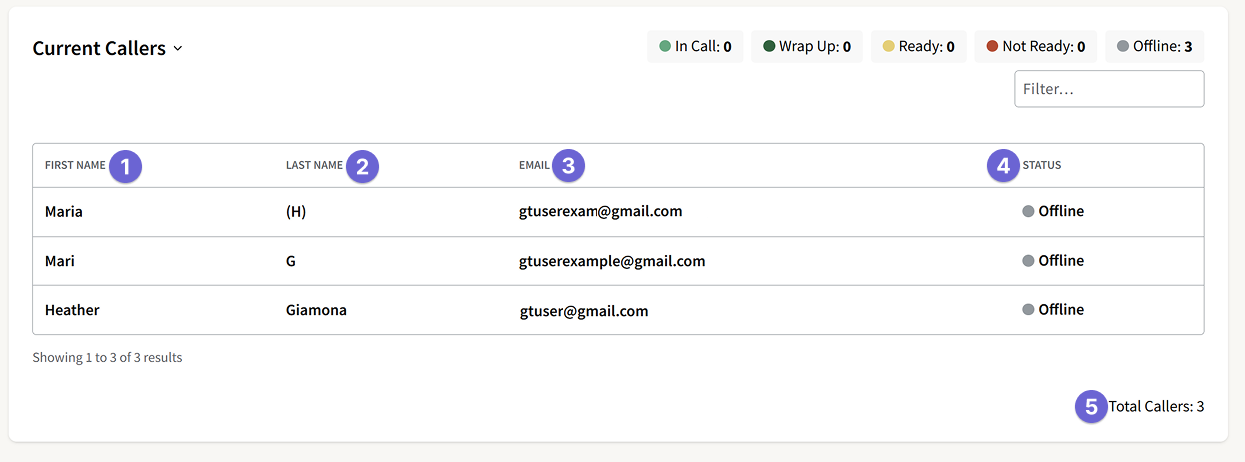
- Caller First and Last Name: The first name(s) of all the callers you have selected to call on this campaign.
- Last Name: The last name(s) of all the callers you have selected to call on this campaign.
- Email: The email address(es) of the callers you have selected to call on this campaign.
- Calling Status: The real-time calling status of in call, wrap up, ready, not ready, and offline. For definitions, review Caller Activity Statuses.
- Total Callers: The total count for callers attached to the campaign.
- Search box to filter callers listed.
- Total Caller count for each calling status.
PatchThru Targets
You’ll only see this section if PatchThru targets were added to the campaign either prior to launch or after launch via the campaign's PatchThru tab. Review the guide Launching a ThruTalk Campaign - Section: Add PatchThru Targets for details.

- Name: The full name of the target.
- Phone: The phone number of the target.
- Type: The category for the target.
- Total Targets: The total number of targets added to the campaign.
Exports
The Exports tab is where you can generate an export of all campaign dials or PatchThrus completed within the campaign. Exporting is available on active and archived calling campaigns.
- To start the exporting process, select the export type that you would like to run from the drop-down menu
- Click the New Export button to begin generating the report.
- The export will begin processing and display finished once generated.
- Click Download to download your export.
Important Details:
- The Campaign Dials export includes up to three custom fields, if they’ve been marked as ‘Included in Export’ on your Custom Fields page. See our guide Custom Fields for more info. Custom Fields are not available for PatchThru exports.
- To have calling data nightly exports sent to an S3 bucket, please check out our guide Nightly S3 Export Delivery for next steps.
- Please refer to our guide, Call Results, for the differences between call and script results in your export.
- The download links expire after a short time to ensure your data's security. Please review our Export Download Error - Link Expired guide for more information.
- Exports are generated as snapshot CSVs, which include all activity recorded at the time the export is created. If an export is run during live calling, the export may not show calls made in the last 5 minutes.
PatchThru
The PatchThru tab takes you to the page where you can add or remove PatchThru targets within the campaign. This tab is only available for active campaigns.

- Create a New Target: Button to create a new PatchThru.
- Once the target is created, it will be added to the PatchThru Directory and available under Choose Targets. Learn how to create PatchThru Targets in the PatchThru Directory.
- Choose Targets: PatchThru targets within the account that can be added to the campaign.
- Chosen Targets: PatchThru targets within the account that have been added to the campaign.
- Targets can be added before or after launch, but targets cannot be removed from an active calling campaign after launch.
- Save: Button to save PatchThru target changes.
- Back to Active Campaigns: Link to open the active campaign index.
For all admin-specific PatchThru steps, check PatchThru Step-by-Step.
Callers
The Caller tab takes you to the page where you can add or remove Callers within the campaign. This tab is only available for active campaigns.

- Choose Callers: Users within the account that can be added to the campaign.
- Chosen Callers: Users within the account that have been added to the campaign.
- Callers can be added before or after launch, but callers cannot be removed from an active calling campaign after launch.
- Save: Button to save caller changes.
- Back to Active Campaigns: Link to open to the active campaign index.
Removing Campaign from View
While campaigns cannot be paused, you can edit the campaign's close time to a past time to make it unavailable to callers. To reopen the campaign, you can then edit the close time to a future time.
Please review our guide Launching a ThruTalk Campaign for information on campaign creation.