Messenger - The Texting Interface
The Messenger is the page where users can send, receive, and respond to messages.
This guide will show you how to use the Messenger to send and respond to contacts. This guide describes the user messenger, which is the only messenger that users with the User permission level can access. Admins can access the admin messenger, which can be identified by the yellow banner across the top, which has some additional capabilities.
Before reading this guide, make sure you've read our guide Getting Ready to Text.
TABLE OF CONTENTS
The Messenger
After opening an assignment, you'll arrive at the messenger. The image below shows the messenger when you have initial messages to send.

- Assignments: Click to exit the messenger and go back to the assignments page.
- Contact Name: The name of the contact you're texting.
- Conversations: On the left panel of the messenger, you'll see conversations. You can search for a contact in the search bar or click on a different name to switch to a different conversation. The name highlighted is the conversation that appears in the middle panel.
- Right Panel: This displays different tools and information for an assignment. Click on Survey, Replies, or Info to switch between the tabs. By default, Info will be showing. You won't need surveys or replies until you get replies - more on that in the next section.
- Assignment Name and Description: This displays the assignment name, also known as the campaign name, as well as the assignment description.
- How to Send Messages: This section contains a shortcut to our tutorial video on sending messages.
- Custom Fields: This displays the custom field values for the contact in the active conversation. This section only appears if there are custom fields mapped in your group.
- Text Message Editor: Here you can see and edit the message that will be sent when you click Send.
- Send Button: Click Send or Send All to send messages.
- You will see Send or Send All depending on whether QuickSend is enabled, and depending on the type of message - initial message, followup, or reply. Read more about this here: Sending Method Information for Message Senders.
- Click the Smiley face to open the emoji picker to add emojis to the message.
Responding in the Messenger
After you've sent your initial messages and got some responses, you'll see some new buttons.

- Sort: Change the order of conversations in the contacts list. These include:
- Needs Reply: A conversation that Needs Reply is one in which the last activity was an incoming message and it has a green dot to the left of the name. In this sort order, conversations that need a reply will appear above conversations that have been replied to. When conversations receive new replies, they will appear at the top of the list.
- Recent: Conversations are sorted by recent activity - conversations with more recent activity at the top and older activity at the bottom.
- A to Z: Conversations are sorted alphabetically beginning with A at the top and ending with Z at the bottom. Capitalization matters here, so upper-case names appear above lower-case names.
- Contacts: This is a list of conversations, labeled by the contact name, of contacts who have had some incoming activity. All other conversations are hidden.
- Hide: Click this to remove a conversation from your inbox. If the conversation is over and doesn't need a response, you can hide it to remove it from view. The conversation will re-appear if there's some new activity, such as a new incoming message or a new followup. This action can not be undone, so only click this if you want to remove this completely.
- Opt Out: This unsubscribes the contact from receiving any further messages from your account, and sends them a text message to the contact confirming they've been opted out. Read more here:
- Right Panel: Click Surveys, Replies, or Info to navigate different tabs in the panel. Check for Surveys to record data about your conversation or Replies to assist in responding. Read more about these in our guides:
- Messages: See the conversation history in the middle panel.
- Text Message Editor: Type responses here and click Send to respond.
Sending Texts on a Mobile Device
ThruText is a mobile-friendly that works on phones and tablets in mobile browsers, so no separate app download is required. Much of the website will look the same, except for the panels in the messenger. See how to open the panels below:
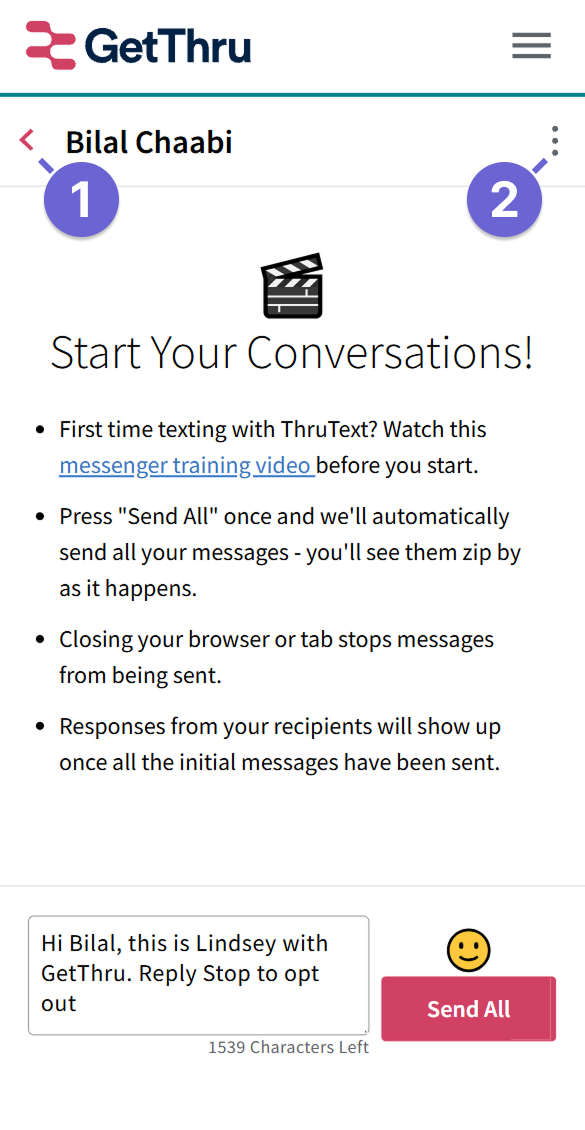
- Left Arrow: Click to open the left panel where you can view and search contacts.
- Three Vertical Dots: Click to open the right panel where you can view the Info, Survey or Replies tab.
Here's how the left and right panel appear in the mobile view:
 |  |